TOC
The automated static website generators (e.g., Octopress, Hexo, and Hugo) have made website building and maintaining way more relaxed than before. The workflow has been simplified to: write and save markdown – preview on the localhost 1313 – generate the ~/public (HTML) file – push to a remote server (GitHub) – backup source code.
If one considers all technicalities, there are still many questions worth discussing to make this process more efficient, such as (1) which is the best way to host HTML files and source code files (2), which is the better way to automate the procedure.
I used to use Hexo where three things need to be tracked separately: source code and ~/public file (both updated for every article), forked/cloned theme (updated according to theme author), and Hexo generator. I have to use git submodules to track everything. Soon, the hustle and page generation speed make me convert to Hugo. Hugo requires only a binary file to generate a website, with which the update cannot be more straightforward: you download a new .exe file and replace the old one. The updated theme can be manually merged as long as the site config.toml file is well preserved.
Let’s go back to the first issue. The Hugo official manual has given two way to publish ~/public file: (1) using Master branch of user.github.io to host /doc (instead of public) folder, which is the easiest one to me; (2) using gh-pages and the advantage of this method is that allows you to have another branch hosting source code in the same repo. I fail to generate /doc file somehow, but it gives me a chance to try Wercker, which surprisingly allows me to achieve the first method with the same advantages as the second method. Long story short, now I am using the Master branch of user.github.io to host ~/public file and dev branch to host source file.
My answer to the second issue is using Wercker. It will automatically go to your source code repo and build the ~/public folder and deploy the website. So the process mentioned at the beginning of this article becomes even easier: write and save an article in markdown – push the full source code to the remote repo. This means you do NOT need to generate and deploy in the local terminal anymore. Wercker does the work every time it detects a new push on the designated repo on the remote server. The script wercker.yml (generated and pushed by you) will tell Wercker precisely how and where to build and deploy. There are also other popular continuous integration tools such as Travis CI, Jenkins, which has advantages at different aspects such as free usage, commercial stability, running speed and etc. I choose to use wercker based on my needs.
The Hugo instruction https://gohugo.io/hosting-and-deployment/deployment-with-wercker/ is very detailed and well written, and you should be quite clear before the ‘Configure Access’ section. The Wercker has changed quite a bit in the generating wercker.yml part. You do NOT HAVE to search and choose boxes or steps to build and deploy. The default script contains the box information, and it can be modified unless you don’t like it. The build and deploy part are generated separately in the workflow section (press CTRL and + to see the bigger picture) 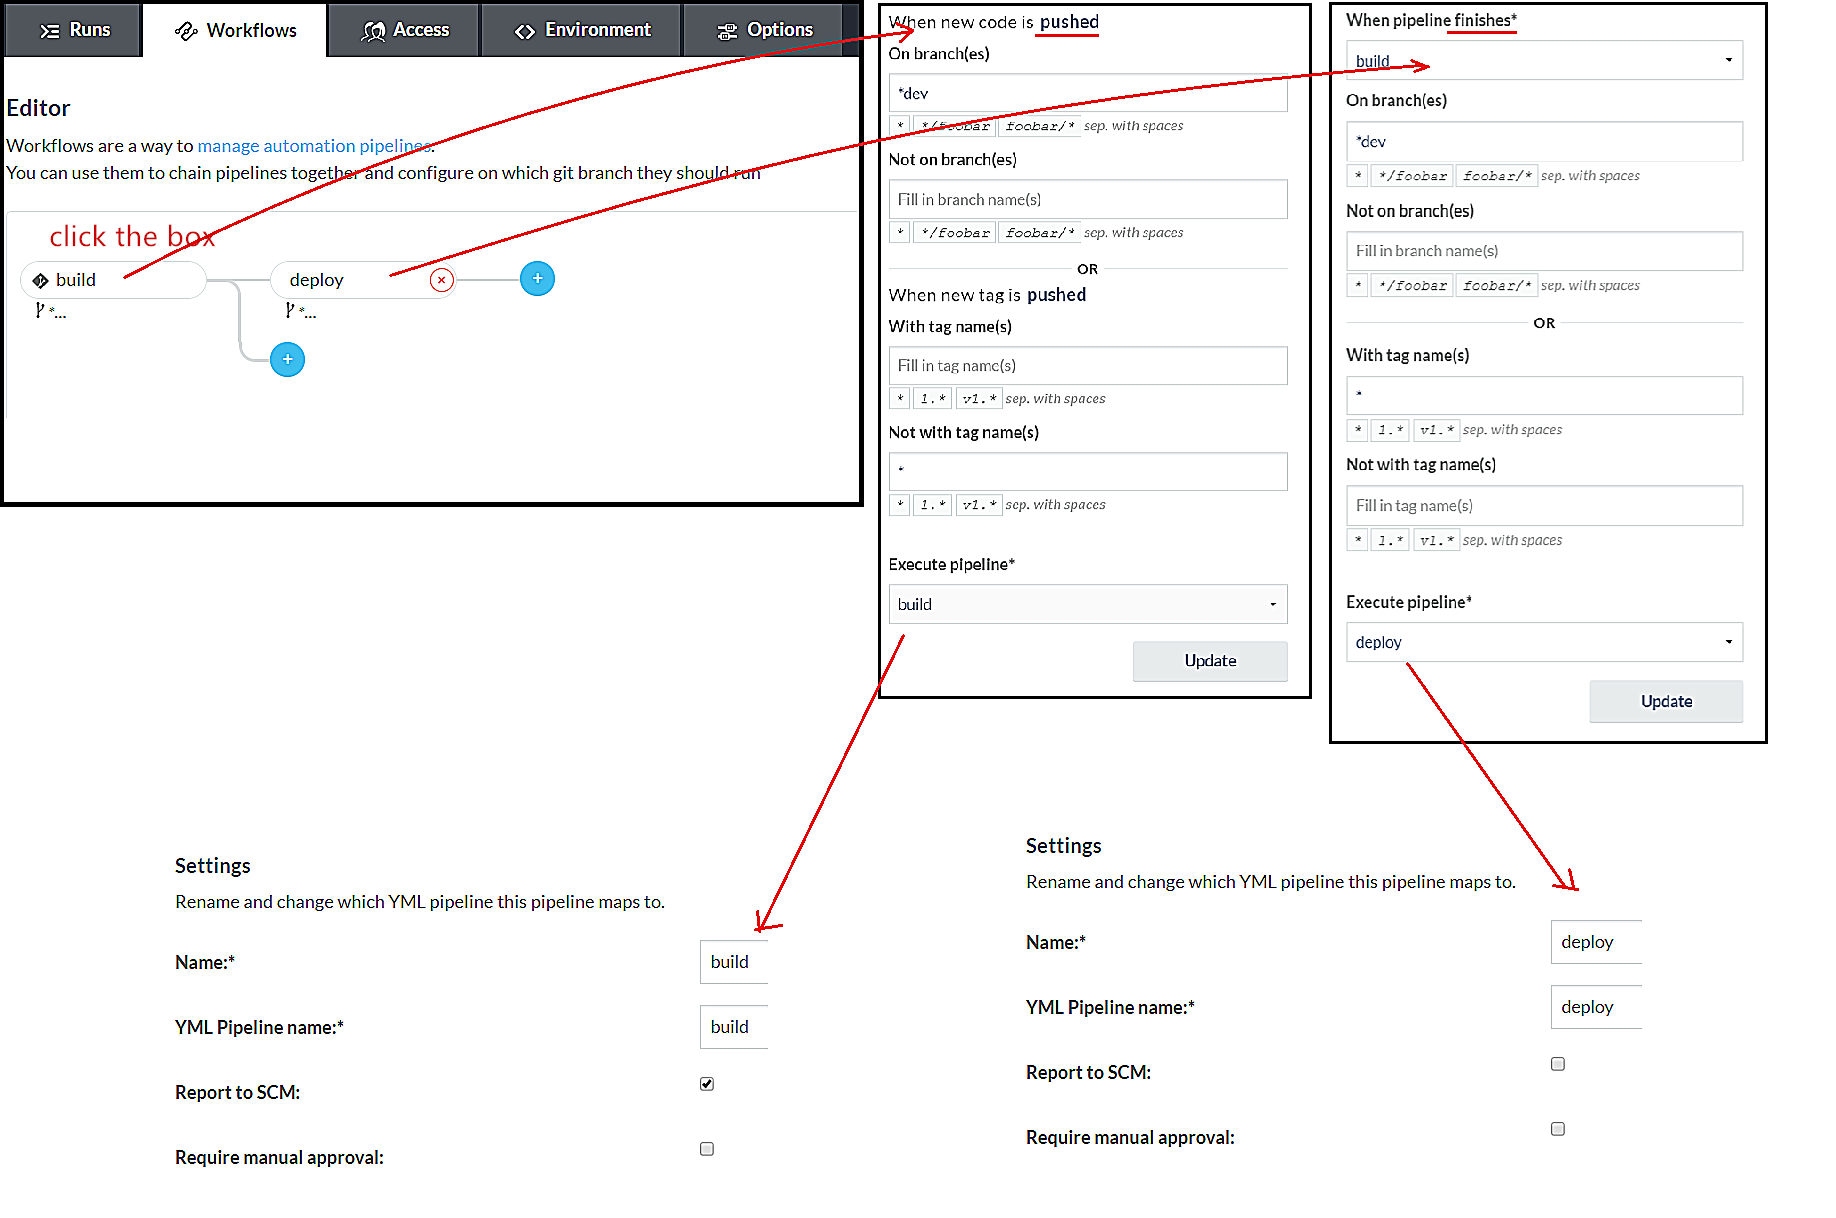
Here is my wercker.yml:
# This references a standard debian container from the
# Docker Hub https://registry.hub.docker.com/_/debian/
# Read more about containers on our dev center
# https://devcenter.wercker.com/overview-and-core-concepts/containers/
box: debian
# You can also use services such as databases. Read more on our dev center:
# https://devcenter.wercker.com/administration/services/
# services:
    # - postgres
    # https://devcenter.wercker.com/administration/services/examples/postgresql/

    # - mongo
    # https://devcenter.wercker.com/administration/services/examples/mongodb/

# This is the build pipeline. Pipelines are the core of wercker
# Read more about pipelines on our dev center
# https://devcenter.wercker.com/development/pipelines/
build:
    steps:
    # Steps make up the actions in your pipeline
    # Read more about steps on our dev center:
    # https://devcenter.wercker.com/development/steps/
        - arjen/hugo-build@2.8.0:
            # your hugo theme name
            theme: hugo-theme-cleanwhite
            flags: --buildDrafts=false
deploy:
    steps:
        - install-packages:
            packages: git ssh-client

        - sf-zhou/gh-pages@0.2.6:
            token: $GIT_TOKEN
            domain: sheishe.xyz
            repo: QiKatherine/QiKatherine.github.io
            branch: master
            basedir: public
Notice the name ‘build’ and ‘deploy’ in the workflow above need to be the same with the name in steps in the wercker.yml file.
You can also add a local deploy.sh to make source code push easier too:
#!/bin/bash
cd ~/Hugo/myblog/

# Add changes to git.
git add .

# Commit changes.
msg="rebuilding site `date`"
if [ $# -eq 1 ]
  then msg="$1"
fi
git commit -m "$msg"

# Push source and build repos.
git push origin -u dev
Happy hacking! :)
comments powered by Disqus